Showing posts with label LIM. Show all posts

Saturday 27 November 2021

Less is More Challenge #457 ... and some news

Good morning

It's Saturday and time for a new challenge over at Less is More.  The Design Team will be taking a short break throughout December so this will be the last challenge of 2021.

...and it is with a heavy heart that after six and a half years (how is it that long?!!!) I have decided to step down from this fabulous challenge Design Team.

After a few weeks as a Guest Designer, I joined the team in May 2015 (Challenge #225!), creating alongside the wonderful Chrissie, Sarah and Anne.  I had the pleasure of meeting these gorgeous ladies at a Craft Retreat a few years ago organised by our amazing Kylie, and later met the lovely Sharon, who has been running the challenge brilliantly in the most recent years.  They are all such great friends and will continue to be beyond Less is More.  And, of course, not forgetting my other LIM teamies past and present, I've learned so much from a fantastic bunch of CAS designers so I'm sending a huge thank you to all of you.

I won't be disappearing, I just feel like I need to have some time without the commitments and deadlines of a Design Team.  I would like to find more time to use my stash and just play!  


Ok, enough of the sadness, here's the info for the new challenge...


Image by monicore from Pixabay


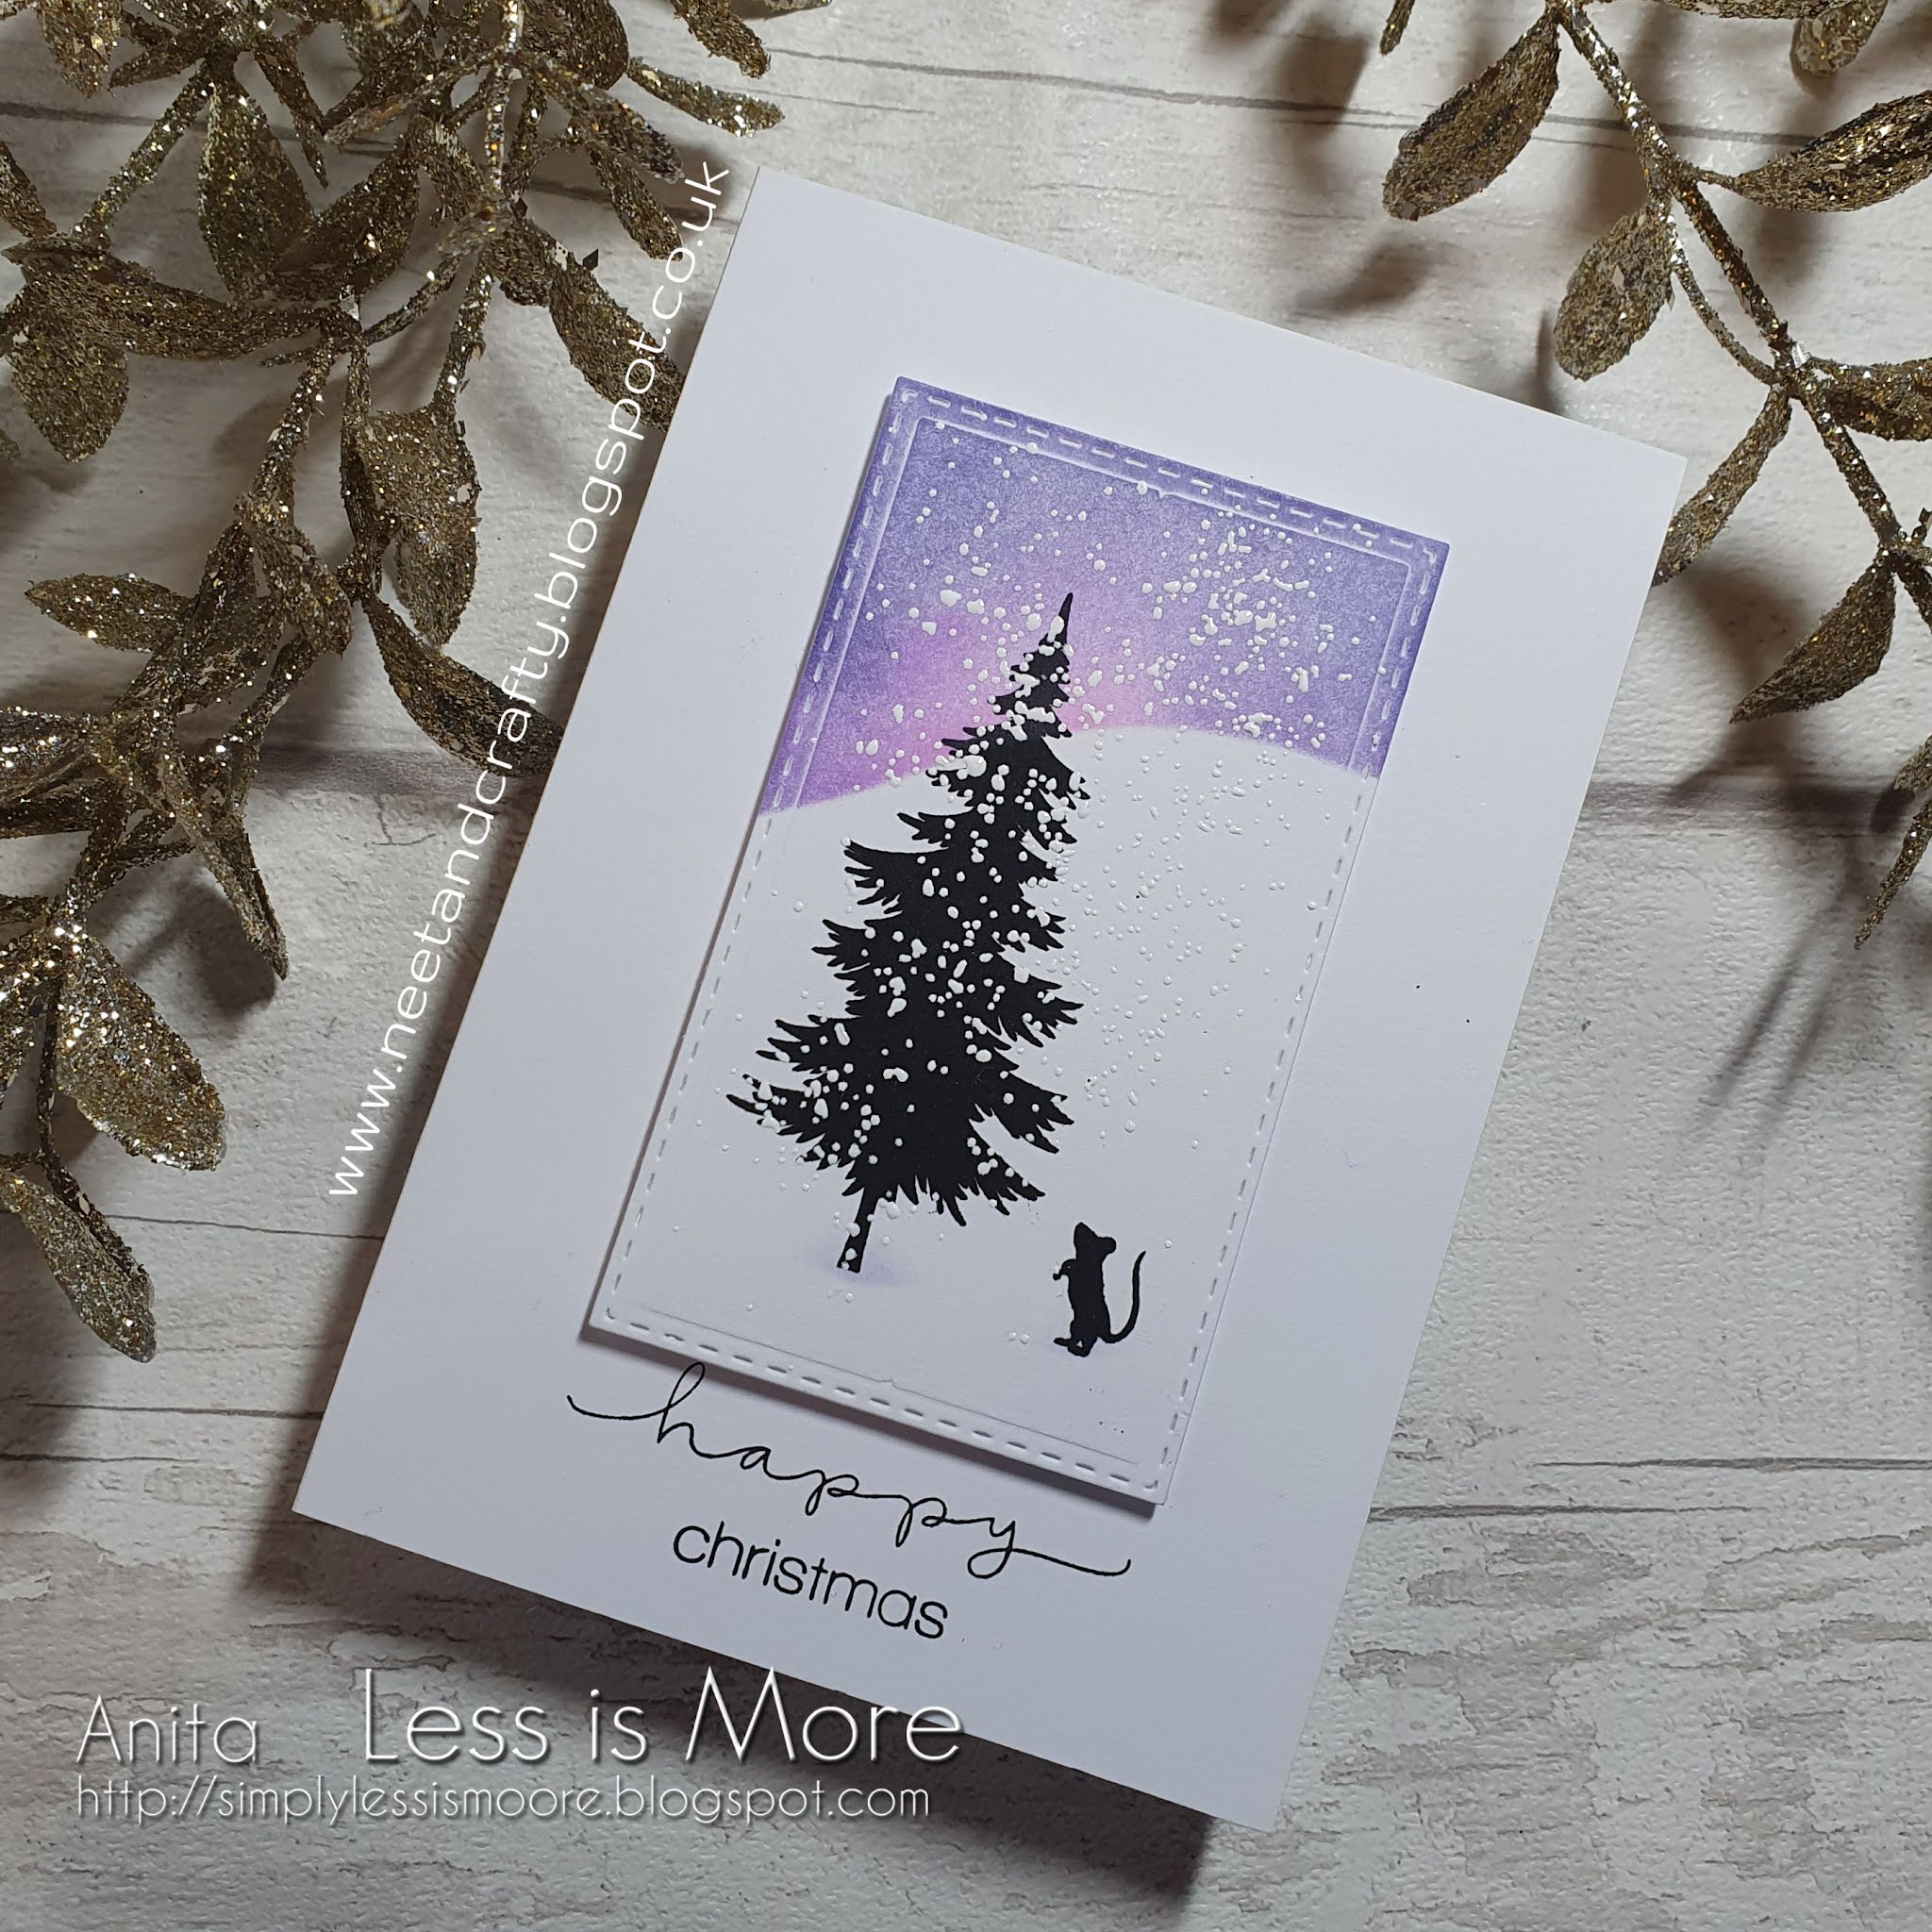
Here's my card, I think you can see how I was inspired by the photo!


I began with a die cut panel of kraft cardstock.  I then grabbed some paper that has been in my stash for many many years, I think it was part of a bigger kit.  The red paper is shimmery and has a kind of jacquard pattern/print on it.  I used a stitched die to add the dash lines and then cut into a couple of strips.  I then used a bow die set and cut this from the same paper.  I die cut some pine needles from white glitter cardstock and a little tag from white card and stamped the sentiment.  It was then just a case of positioning and adhering.  I originally wasn't going to add the tag as the 'ribbon' already displays the sentiment but I think the tag finishes it off nicely.

You can see the design of the paper a lot clearer in this photo...


Materials used:
  • Dies: Create a Smile - Cool Cuts Double Stitched Rectangles; Paper Smooches - Dots and Dashes; Frantic Stamper - Small Solid Bow; Marianne Design Creatables - Petra's Larix Larch; MFT Die-namics - Blueprints 26 (tag)
  • Stamps: The Greetery - Budding Beauties Winter
  • Cardstock from stash

Thank you so much, LIMettes, for all your support and encouraging comments on my designs for Less is More.  Clean and simple is the style I love and I also love how this challenge has taken so many of you out of your comfort zones to try CAS designs.  

So this isn't goodbye, I'm sure I'll be a participant of LIM as I always have been since I began this blog xx


Saturday 13 November 2021

Less is More Challenge #456

Good morning

Welcome to Saturday and a new challenge over at Less is More.  Today it's a Theme challenge, here's the cue card...


We have our September winner joining us as a Guest Designer today, the super talented and wonderful CAS card creater, Asa.  Please do pop over to her blog to take a look at her card and to say hi.


As always at this time of year I'm behind with making my Christmas cards so if the theme fits, that's what I'm making! :)


I began with a die cut stitched rectangle and then ink blended the skyline.  I figured out where the tree and mouse would be stamped and added a little ink blending to ground them.  These were then both stamped in black.  Next I sprinkled over some embossing enamel to create some snow, heating from the underside so the heat gun didn't blow it out of position.  I then adhered the panel onto the card base using fun foam before stamping the sentiment below.


Materials used:
  • Die: Create a Smile - Cool Cuts Double Stitched Rectangles
  • Ink: Versa Color - Neptune, Heliotrope, Lilac; Versafine Clair - Nocturne
  • Stamps: Card-io - Magical Christmas (mouse); Woodware - Three Trees; Simon Says Stamp - Happy
  • Accents: Stampendous Deep Impression Embossing Enamel - Chunky White

Challenge entries:

Stamping Sensations - November Challenge - Christmas
We Love Stamping - November Challenge - Christmas
Happy Little Stampers - November Christmas Challenge - Anything Goes: Make a Scene


There's lots of inspiration from my teamies over at the Less is More challenge blog, and as always the challenge link is open for two weeks.  Hope to see your cards in the gallery.


Saturday 30 October 2021

Less is More Challenge #455

Good morning

Apologies that it's been two whole weeks since I last posted here, life just becomes busy sometimes and I haven't found time to craft and share.

As we have five Saturdays's in October, Less is More have an extra Lucky Dip challenge for you starting today.  So, I'll get straight to the cue card for this one...


I thought I'd make a card using just dies for this one, it's been a while since I didn't reach for my stamps but I enjoyed making this one...


I began by raiding my stash and fishing out some different white cardstocks.  For some background interest I chose a linen cardstock for my main die cut panel.  I then die cut the poinsettia ribbon from some off-white pearlescent cardstock, i thought that would showcase the detail on the flower, and the Merry Christmas frame was die cut from some white glitter cardstock.  After adhering the panel to the card base I adhered the poinsettia ribbon, leaving the flower without any adhesive at this point.  I then adhered the frame, gently lifting the flower petals through, which I then finally adhered using some glue dots for a little dimension.  To finish, I added some glitter jewels to the centre of the flower.

Materials used:

  • Dies: Create a Smile - Cool Cuts Double Stitched Rectangles; Poppy Stamps - Poinsettia Ribbon; MFT Die-namics - Merry Christmas Circle Frame
  • Cardstock: a selection from my stash
  • Accents: Cosmic Shimmer Glitter Jewels - Iced Snow

Challenge entries:

Happy Little Stampers - October Anything Goes with Dies Challenge
Happy Little Stampers - October Christmas Challenge - Anything Goes


Thanks so much for taking a look today.  I'm hoping to get some cards made this weekend, I really need to make a start on my Christmas cards or it will be the usual mad panic at the end of November when I realise I still need about 70 more!

Enjoy your weekend, folks x


Saturday 16 October 2021

Less is More Challenge #454

Hi there, Happy Saturday

At Less is More today we have a new challenge and we're back with the dreaded One Layer!  But the theme is an easy one, here's the cue card...


For my card base and white space I chose some very lightly textured tan cardstock...


I aligned a metal stencil off the edge of my card front, held it in place with some stencil tape and then blended through it with four shades of Distress Ink.  I then finished it with a simple sentiment stamped in black.  And that was all.  I did think about adding some gems but I don't think it needs anything else.


Materials used:
  • Stencil: Sweet Poppy Stencils - Foliage
  • Ink: Distress Ink - Peeled Paint, Brushed Corduroy, Fossilized Amber, Aged Mahogany; Versafine Clair - Nocturne
  • Stamp: Altenew - Leaf Canopy 
  • Cardstock from stash

Challenge entries:

CAS on Friday - Challenge #216 - Autumn or Halloween
My Time to Craft - Challenge #468 - Halloween or Fall Colours
Happy Little Stampers - October Stencil Challenge - Anything Goes
STAMPlorations - October Stencil Challenge - Anything Goes


Thanks for visiting today, have a wonderful weekend.


Saturday 2 October 2021

Less is More Challenge #453

Hi guys

My goodness, where did September go?  Autumn is well and truly here in the UK, there's definitely a nip in the air.  I'm back working at the office now so I've certainly noticed a change in temperature now that I'm having to jump in the car early on the chilly mornings!

So, we've rolled around to another Saturday and it's time for a new challenge over at Less is More.  It's a colour challenge this time and we want to see you using...


I originally had a floral stamp in mind that I wanted to use but it had a lot of leaves and I was stumped about how I could avoid using green (the guidelines are to use the challenge colours and neutrals only), so I had a rummage in my stash and found these daisies from a retired Clearly Besotted set from years ago...


Although not a true layering set, this set does have the solid stamps which allow you to colour the image by stamping.  So, on a die cut panel I stamped the linear image in black, the solid areas of the daisies in purple and the flower centres using the striped stamps from the set, in yellow.  The bow/string is from the co-ordinating die set which I cut from a scrap of yellow cardstock.  I then finished with a heat embossed sentiment on a die cut purple strip.

Materials used:
  • Stamps: Clearly Besotted - Celebrating You; Altenew - Flower Vine (sentiment)
  • Dies: Create a Smile - Cool Cuts Double Stitched Rectangles; Altenew - Featured Sentiments Die Set; Clearly Besotted - Celebrating You Die Collection
  • Ink: Versafine Clair - Nocturne; Altenew - Hydrangea, Warm Sunshine; VersaMark
  • Embossing Powder: Brutus Monroe - Alabaster

Thanks for visiting today, if you need more inspiration using the challenge colours please do take a look at the main challenge blog where my teamies are sharing their great projects.

Have a lovely weekend. 


Saturday 18 September 2021

Less is More Challenge #452

Good morning

It's Saturday and another new challenge day over at Less is More.  Today it's the turn of our Recipe challenge and here's the cue card...


For my sample card I almost went for a honeycomb theme, then contemplated going for a geometric design, but then I remembered I have a stencil called Chicken Wire, so that was my starting point for this fun card...


I absolutely love a stamp set I have by Gerda Steiner called Chicken Scratch so wanted to combine that with the stencil.  I die cut a panel with a scalloped rectangle die and then added as post-it note to the left side as I wanted to mask off the edge.  I stamped the chicken and coloured her with Copics then, with the mask still in place, I treated the area with anti-static powder before then inking through part of the stencil with VersaMark ink.  I removed the stencil and the mask and then heat embossed with silver embossing powder, brushing away any stray areas of powder which clung to where the mask had been.  To finish I heat embossed the sentiment on a black die cut strip and mounted the panel on fun foam.


Materials used:
  • Stamps: Gerda Steiner - Chicken Scratch
  • Stencil: The Crafters Workshop - Chicken Wire
  • Dies: Create a Smile - Cool Cuts Scalloped Rectangles; MFT Die-namics - Wonky Stitched Rectangle Stax
  • Ink: Memento - Tuxedo Black; VersaMark
  • Coloured with Copics
  • Embossing Powder: Wow! - Metallic Silver; Brutus Monroe - Alabaster White

Challenge entries:

Happy Little Stampers - September Stencil Challenge - Anything Goes
AAA Cards - Game #198 - Up to One Third
My Time to Craft - Challenge #466 - Embossing
CAS on Friday - Challenge #214 - Sketch (I've flipped it right to left)


Thanks for visiting, I hope you'll join in with this challenge.  There's plenty of inspiration over at the main LIM challenge blog from my teamies, go take a look :)


Saturday 4 September 2021

Less is More Challenge #451

Hi guys

At Less is More this morning there is a Theme challenge just starting.  Here's the cue card for this fortnight's challenge...


A pretty simple theme, just add some sparkle to your clean and simple designs.


And joining us as a wonderful Guestie for this challenge is the super talented Viv of Daizy-Mae Designs.  Viv is a loyal participant at Less is More and I'm sure many of you are familiar with her beautiful work.  Please do pop over to take a look at her project and to say hello.


I've not even begun my Christmas cards for this year so thought it was good time to get at least one made!  Here's my DT card and I decided to make a shaker...


I started with a die cut rectangular panel and then die cut using the snowglobe to form an aperture.  A then cut a second snowglobe from white glitter cardstock and set this aside.  Next I stamped the sentiment in dark green ink.  I adhered some acetate behind the window and covered the rear of the panel with 3D foam.  Next I die cut some trees from green cardstock and added some 'snow' using a white pen.  I adhered these to the card base, positioned so they would show through the aperture.  I then piled some glitter jewels over the trees and spread it out slightly before then adhering the panel over the top, trapping the shaker filling inside.  To finish, I adhered the white glitter snowglobe die cut over the acetate to frame the scene.


Materials used:
  • Dies: Create a Smile - Cool Cuts Double Stitched Rectangles; Clearly Besotted - Snowglobe Die; Craft Emotions - Pine Trees
  • Stamp: Clearly Besotted - Mini Messages
  • Ink: Altenew - Evergreen
  • Accents: Cosmic Shimmer - Glitter Jewels: Iced Crystals; Signo Uniball pen - white
  • Cardstocks and acetate from stash


For more inspiration, take a look at the main Less is More challenge post, where my teamies are sharing lots of different ways to use sparkle and, surprisingly, only one of my teamies has also made a Christmas card!  Sparkle isn't just for Christmas, eh!


Saturday 21 August 2021

Less is More Challenge #450

Good morning

At Less is More it's the turn of our One Layer challenge.  While these can prove to be tricky, I think the theme this time gives a lot of options.  Here's the cue card...


Our Guest Designer for this challenge is one of our regular and talented participants and our June winner, Maaike!  Please do pop over to her blog to say hi and to take a look at her creation.

For my sample card I used some products which are new-ish to my stash but as yet unused, and I also used ink colours that I don't often reach for...


I sectioned off part of a stencil just leaving six dots positioned in the centre of my card base.  I then blended three shades of ink - the muted pink into grey/blue then into the green.  The transition from the pink to blue isn't a great blend but I love these three colours together.  I then stamped the two gorgeous eucalyptus images in black and stamped the small sentiment below.

Materials used:
  • Stencil: Clearly Besotted - Round & Round
  • Ink: Distress Ink - Victorian Velvet, Weathered Wood, Iced Spruce; Versafine - Onyx Black
  • Stamps: Create a Smile - You Can Do It; Altenew - Flower Vine (sentiment)

Challenge entries:

NBUS - Challenge #29 - first use of stencil and stamp set
Happy Little Stampers - August Stencil Challenge - Anything goes


Thank you so much for taking a look, your visits and feedback are always welcome and appreciated.  I hope you have a lovely weekend.


Saturday 7 August 2021

Less is More Challenge #449

Good morning

This time over at Less is More it's the turn of a Colour challenge.  I'll get straight to the cue card...


We have a fabulous Guest Designer joining us for this one.  It's Sid who was our winner for the month of May.  Please do pop over to take a look at his project for this challenge and to say hi.

For my sample card I used some products which are brand new to my stash and only arrived in the mail earlier this week.  Yes, that's how last minute my Design Team makes are these days!  

I discovered Simply Graphic, a fabulous French company, thanks to my former LIM teamie, Chrissie, sharing some of her beautiful makes using their dies.  I just couldn't resist placing an order.

Here's what I made...


All the dies you see here are from Simply Graphic, apart from the sentiment oval.  I began with a piece of watercolour paper and used a mix of Brushos and water to create a background of differet blue shades, and it was this that the two main flowers were cut from.  I die cut the tall leafy stem from white cardstock and the shorter foliage from pale blue vellum.  I gave my card base a light splattering using Distress Ink mixed with water and then arranged and adhered the cluster of die cuts.  I stamped the sentiment in dark blue onto an oval die cut and adhered this using glue dots.  The card was then finished with a few pool toned jewels.


Materials used:
  • Dies: Simply Graphic - a selection of flowers and foliage; Lil' Inker Designs - Stitched Ovals
  • Stamp: Clearly Besotted - Simple Script
  • Ink: Brushos - Ultra Marine, Turquoise, Emerald Green; Distress Ink - Broken China; Altenew - Desert Night
  • Vellum from stash
  • Accents: Little Things from Lucy's Cards - Jewels: Shimmering Pool Mix

Challenge entries:

NBUS - Challenge #29 - I just had to share at Darnell's challenge, I don't think I've ever used new products so quickly before!


If you need more inspiration, don't forget that my teamies are sharing their projects over on the main LIM challenge post, and if you follow their links they may have more on their personal blogs too.

Happy Saturday, enjoy your weekend :)


Saturday 24 July 2021

Less is More Challenge #448

Good morning

At Less is More we have something a little different for you for this next challenge.  Today is my fellow teamie, Elaine's, birthday and we thought it would be a fun idea for her to create a card for us all to CASe.


Here's her gorgeous creation, which includes lots of elements and techniques from which to draw your inspiration.
Happy Birthday, Elaine.  I hope you have a fabulous day! x


Ok, for my card I focused on a few elements:
  • Florals
  • Shades of orange
  • Tiled effect
  • Tiny sentiment


I knew I had a yet to be used stencil of blocks in a tiled layout so that was my starting point.  I laid this down on a panel of white cardstock at an angle and off the edge, no idea why, I was obviously feeling very jaunty angle-ish!  I lightly blended the palest of my inks to give the blocks some definition.  I then used a set of floral layering stencils, laid over the top, and inked through with two more shades of orange.  I always love the reveal when you remove stencils, I wasn't sure how this would look but I was pleasantly surprised.  I then trimmed the panel down, stamped the sentiment along the diagonal edge of the stencilling and adhered it to my card base on fun foam.  A really quick make!

Materials used:
  • Stencils: Clearly Besotted - Building Blocks; Altenew - Layered Dahlia
  • Ink: Distress Oxide - Dried Marigold, Spiced Marmalade, Abandoned Coral; Versafine - Onyx Black
  • Stamp: Altenew - Flower Vine

Challenge entries:

Addicted to Stamps and More - Challenge #410 - Die Cuts and/or Stencils
Happy Little Stampers - July Stencil Challenge - Anything Goes
NBUS - Challenge #28 - (first time using the Building Blocks stencil)


Thanks for taking a look.  For lots more inspiration for this challenge please do pop on over to the main Less is More challenge post where my teamies are sharing their projects inspired by Elaine's card, so many great makes.  


Related Posts Plugin for WordPress, Blogger...